One request we frequently receive is to display fly-out menus, the Top Nav in place of the Quick Launch, or both. I recently found a way to completely move the Top Nav to display where the Quick Launch would normally display and hide the Quick Launch at the same time. This is what I did.
1. Make a copy of the v4.master master page, check it out, rename it, and open it to edit it;
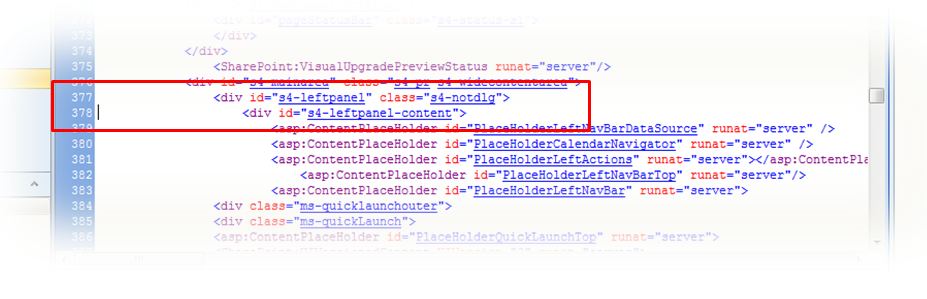
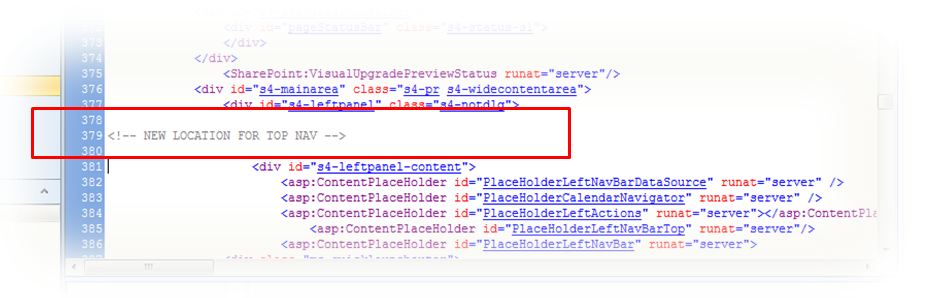
2. Assuming you have still not made any changes to your copy of the v4.master content, go to line 377. 3. I like inserting notes for future reference. So in this particular case, I'm going to insert a comment in between lines 377 and 378, as follows,
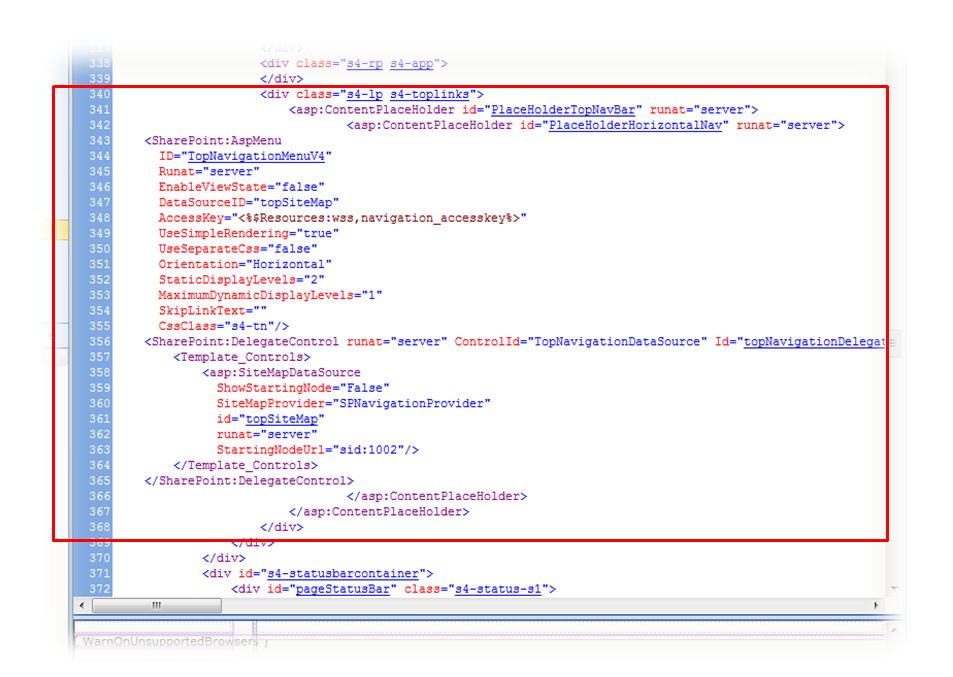
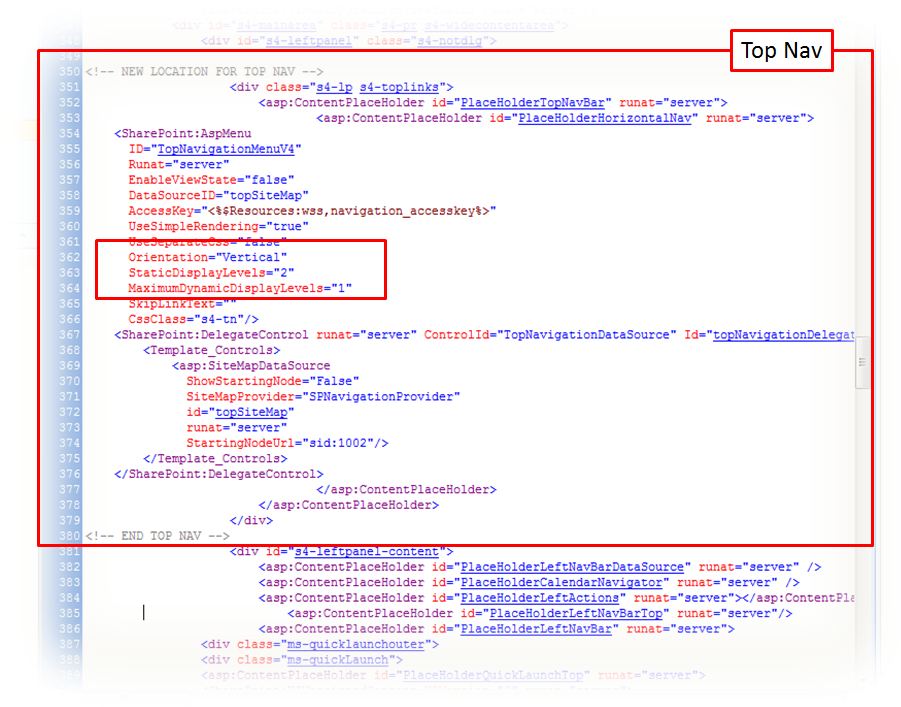
3. Once again we're going to assume you have still not made any further changes to your copy of the master page. Scroll back up and go to line 340. Select lines 340 through 368 and move this to where you inserted your comment for the Top Nav's new location. 4. Now you need to change the Top Nav orientation from horizontal to vertical. In the sample image below, this is done at line 362. Change the default setting where it says Orientation="Horizontal" to Vertical. You can also make adjustments to the static and dynamic display levels and maximum based on your site needs.
5. We also need to hide the Quick Launch so it only displays the Top Nav. To do this, scroll back to the top of your copy of the master page and locate the closing </head>. Once again we'll assume you have not made any other changes that the ones included in this blog post. Therefore, the closing </head> tag should be located at line 35. Insert a line or two between lines 34 and 35 and type in the following, <!-- BEGIN ADDED LINES TO HIDE QUICK LAUNCH --> <style type="text/css">
#s4-leftpanel-content
{
display:none;
}
</style>
<!-- END ADDED LINES TO HIDE QUICK LAUNCH -->
6. Save, check in, publish, and approve the page. Note: If you need to further customize the site for other colours than the ones used by the SharePoint theme applied to the site, you will need to further modify your copy of the master page to register your external CSS file and make a copy of the corev4.css CSS file where you can made your customizations. To learn how to register your external CSS file on your master page, visit my blog post here. For a clean copy of the corev4.css file, visit my Useful Files section. Hint: The following is a list of the main CSS classes that control the look and feel for the Top Nav: - .s4-tn - .s4-tn ul.static - .s4-tn li.static > .menu-item - .s4-tn u.dynamic - .s4-tn li.dynamic > .menu-item - .s4-tn li.dynamic > a:hover - .s4-tn li.static > a:hover - .s4-toplinks .s4-tn a.selected - .s4-toplinks .s4-tn a.selected:hover
"Hiding" would be a better way of describing what I'm about to say, since "Removing" will make SharePoint not render properly.
In other words, I do not recommend removing any Content Place Holders from SharePoint master pages. I recommend turning them off.
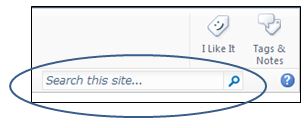
So let's say that you need to hide or remove the Search area from a SharePoint site.
Using SharePoint Designer, open your copy of the v4.master master page.
Locate the following piece of code:
If you have still never made changes to your copy of the v4.master master page, the lines of code I'm talking about go from line 330 to 337.
Tip: Using SharePoint Designer Split View, select the Search box in the lower Design frame and SharePoint will highlight the code in the upper Code frame.
Delete what you don't need. For most of my projects, I delete the entire <div>, starting with the <div id="s4-searcharea" class="s4-search s4-rp"> all to the closing </div> right after the </span>.
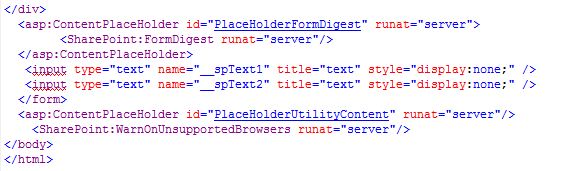
Go to the bottom of the Master Page in the Code view. Locate the following lines of code:
Insert a couple of lines right above the closing </form> tag and type the following:
<!-- Lines below added for unused Content Place Holders -->
<asp:panel visible="false" runat="server">
<asp:ContentPlaceHolder id="PlaceHolderSearchArea" runat="server" />
</asp:panel>
<!-- End added lines for unused Content Place Holders -->
Save, check in, and publish your master page. Go to the browser and test to see how it looks.
As part of one of my assignments I needed to insert four Content Query Web Parts at the bottom of my custom master page for the site. This was a somewhat easy thing to do in MOSS 2007 and you would do it only once on the master page itself. Well, that’s not the case in SharePoint 2010 anymore. You cannot insert Web Parts on a SharePoint 2010 Master Page at all. However, I found a way around it.
Microsoft might have taken that functionality away from us in what concerns Master Pages. But… they have not taken it away when it comes to page layouts. You can insert web parts in a custom page layout.
The main con about this approach is that if you need those web parts available to all pages being created on your site, then you have to create a copy of each page layout available out there and insert the web parts to all of them. So when your customers create new pages, the web parts are going to be there. (By inserting them once in the MOSS 2007 master page you were done; now you have to replicate the job for all page layouts for which you want those web parts to display.)
Note: As I always emphasize, make sure you are working on a copy of Microsoft’s originals and leave the originals from Microsoft alone.
This is what you need to do:
1. Create some “test” or “hidden” page somewhere on the site where you can create your web parts and edit the page;
2. Insert the web part at any web part zone on the page (it doesn’t really matter where since this is more of a placeholder until you are done creating the web part completely). In the case of custom Content Query Web Parts, do all of the necessary customizations to the web parts, style sheets, CSS rule sets, etc.
3. Download the web part or web parts to your hard drive;
4. Upload the web part or web parts to the site’s Web Part Gallery;
5. Using SharePoint Designer, open your custom page layout
6. Go to the location of the page where you would like to insert the web part (it could be a row or cell in a table or a <div>); I usually work in split mode. You may want to use the Code or Design view; it’s up to you and whatever it is easier for you.
7. Select the Insert tab on the ribbon and then select Web Part within the Web Parts group;
8. SharePoint Designer will display a Web Part drop-down menu; locate the web part uploaded in step 4 above and insert it in your page;
9. Save, check in, and publish the page;
10. Go back to your site using Internet Explorer this time (not Designer) and create a page using the modified page layout. Or if you have already created a page using this particular page layout, open it. Make sure the web part is now displaying at the desired location on the page.
Sometimes Microsoft’s CSS still gets in the way of your own code, either not allowing you to make some changes to colours, or ignoring your colour settings completely. Well, I have yet to fix it for the colouring problem. However, I was facing a similar situation where my links were being displayed too way apart (like a good 14 pixels in between them) when I had set it up to have only like 4 pixels in between each (padding-bottom: 4px). So when trying to find out where the code was coming from, I discovered that Microsoft was using not just the corev4.css but also a few other CSS files. One of these files, the one that was overriding my CSS settings was called ‘controls.css.’ (Note: SharePoint uses even other ones other than control.css; that was the one that was messing up my one site; your case could be different.)
I remembered that in MOSS 2007 we had more than one external CSS files being referenced by the selected master page for the site. In that version of SharePoint, depending on which master page we would select, the number of external CSS files would vary. If you have already been modifying any master page in SharePoint 2010, you already know that it does not come with any external CSS registration inside the <head> tag of the master page. You have to manually insert it. I’m talking about the following line of code for a v4.master page in this case:
<SharePoint:CssRegistration Name="<% $SPUrl:~sitecollection/Style Library/YourCoreFileNameHere.css %>" After="corev4.css" runat="server"/>
That way, you can tell the system to first pull the corev4.css and then yours. But still, Microsoft and SharePoint have a mind of their own and sometimes yet another CSS code or file overrides yours. So I wondered if we could declare more than one external CSS files like we used to do in MOSS 2007 so as to override any other ones that could be overriding ours. And after trial and error, I can say that the answer is yes.
But there is a trick to it: You have to follow a specific order. In MOSS 2007 that order was alphabetical. In SharePoint 2010 is ‘linear.’ (I don’t know which other way to call it.) While working on one of my company's portals I discovered that in that particular case it was not only using the Corev4.css, but I also discovered that under certain circumstances, it was pulling the control.css file. So I had to declared my external CSS files in the order of priority, with the most important one being declared at the top and the least important one at the bottom. For that particular project, I only had two files. And this is how I declared them:
<SharePoint:CssRegistration Name="<% $SPUrl:~sitecollection/Style Library/en-us/Themable/Core Styles/PROJACRONYMcontrols.css %>" After="PROJACRONYMCore.css" runat="server"/>
<SharePoint:CssRegistration Name="<% $SPUrl:~sitecollection/Style Library/PROJACRONYMCore.css %>" After="corev4.css" runat="server"/>
By declaring them in this order, I’m telling SharePoint that I first want it to run its own corev4.css, followed, by PROJACRONYMCore.css, which is followed by PROJACRONYMcontrols.css. This way, I have guarantee that my CSS files are going to pull in the priority I want them to and not the way SharePoint feels like it. It is very important that you pay attention to the order; otherwise, it will not work.
Oh, one more thing. If you have no idea which CSS file Microsoft SharePoint could be using and referencing, use any developer's tools you may have access to. If you are using Microsoft's Internet Explorer, press <F12> on your keyboard. This will open the Developer Tools window. Point to the location on the page where the code is not doing what you want it to do and you will see a blue rectangle appearing on the screen (if you are using IE). Then click and you will see a list of CSS files (in the right frame of the Developer Tools window). The one at the bottom is the one that is overriding yours. Click the link (its name) and it will display the code and you will also know the exact location for the file. Then go to SharePoint Designer, make a copy of that CSS file, (never work on the original files, please), rename it, and then modify the setting that is not doing what you want it to do. Check it in and publish it. Finally, go back to your master page and register the new file along with your other ones and in the order I shared above. Publish your master page and verify in the browser if it’s now displaying things the way you want it to.
To register and reference your external CSS file on a custom SharePoint 2010 master page, insert the following line inside the <head> tag of your custom master page. <SharePoint:CssRegistration Name="<% $SPUrl:~sitecollection/Style Library/ YourCoreFileNameHere.css %>" After="corev4.css" runat="server"/> To register more than one CSS external file, check this other post.
Note: I always recommend making copies of Microsoft files and pages and not to work on them directly. For what I described above, I usually make a copy of the v4.master master page and I also make my own copy of the corev4.css file, leaving both the original v4.master and corev4.css files alone.
|

 RSS Feed